Vensim has the capability to do repeated simulations in which model parameters are changed for each simulation. This can be very helpful in understanding the behavioral boundaries of a model and testing the robustness of model-based policies. An example of sensitivity testing is given in Chapter 15 of the User’s Guide. To do a sensitivity simulation, you must enter a list of parameters that will be changed and specify a Save List as discussed above. The Sensitivity Graph tool, Bar Graph tool and Stats tool can then be used to view results. The results can also be Exported for further analysis.
You can start a Sensitivity simulation from the Toolbar or from the Simulation Control dialog. To start from the Toolbar click on the Sensitivity Icon ![]() . This will start the Sensitivity Simulation Setup wizard which will first allow you to set up the parameters to change, then specify the savelist. Once the wizard is open click on Next to go to the next step in the process or Prev to go to the previous step. There is also a Finish button that can be used anytime if you have previously gone through the process and set up the savelist to be used.
. This will start the Sensitivity Simulation Setup wizard which will first allow you to set up the parameters to change, then specify the savelist. Once the wizard is open click on Next to go to the next step in the process or Prev to go to the previous step. There is also a Finish button that can be used anytime if you have previously gone through the process and set up the savelist to be used.
To Start a sensitivity simulation from the Simulation Control dialog you must first specify the name of the sensitivity control file and sensitivity save list in the Sensitivity Tab of the Simulation Control dialog. For both of these files there is also an Edit... button that allows you to make changes to them.
The actual appearance of the dialog for setting control parameters and specifying the savelist will depend on whether you are starting sensitivity simulations from the Toolbar, where they will be wrapped in the wizard, or the Simulation Control Dialog where they will be standalone dialogs. The Savelist Control dialog discussed above is shown as a standalone dialog. Here we show the Sensitivity Control dialog wrapped in the Sensitivity Simulation Setup wizard.
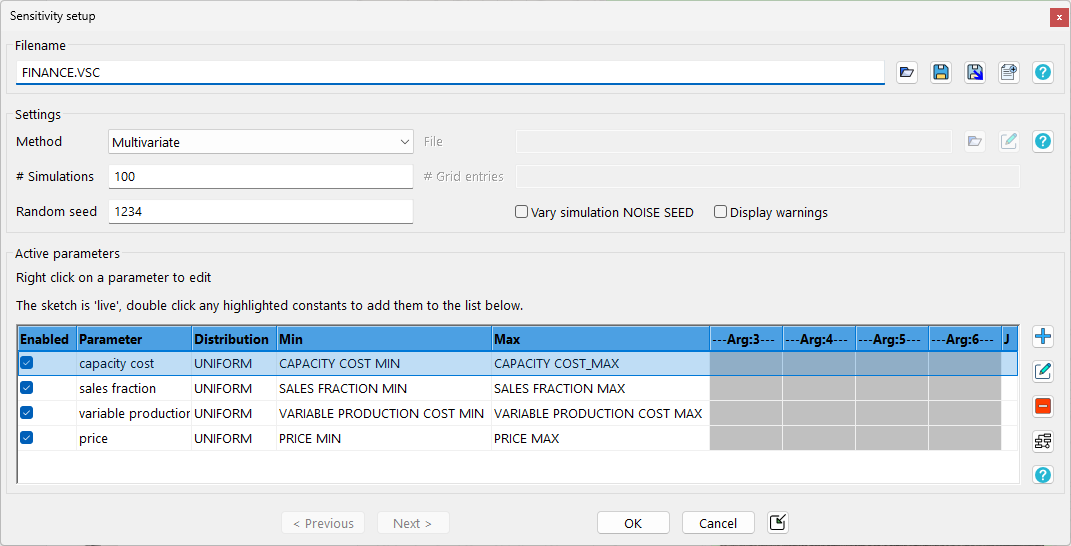
Filename is the name of the Sensitivity Control file. If no sensitivity control filename has previously been specified Vensim will use the model name or, when using the Simulation Control dialog, you will be queried for a name. You can type in a different name if you like. If you do this and that file already exists you will be asked if you want to overwrite it. You do not need to include an extension, Vensim will automatically add one.
Choose New File... allows you to choose a different Sensitivity Control file to work with. When you click on this a File Selection dialog will open. Select the file you want to work with and its contents will replace those in the dialog.
Clear Settings will remove all the parameters and reset the number of simulations, initial noise seed and type of sensitivity simulation to their default values.
Number of simulations lets you set the number of simulations that will be performed. Though this number is not restricted, the time it takes to complete the simulation and display the Sensitivity graphs, along with the storage requirements, make it sensible to try to keep this number less than 1,000. If you leave this blank, 200 simulations (the default) will be made. For the Latin Grid method, the specifies the Number of grid entries, which should generally be much smaller, because the number of simulations will be (number of parameters)^(number of grid points). This number will not be used for parameters that use the VECTOR distribution in Univariate or Grid simulations..
Noise Seed lets you specify the seed to be used in computing the random numbers for the sensitivity analysis. If you repeat the same analysis twice you will get the same results. If you wish to do another trial with the same noise characteristics, but different values for the parameters being chosen, then you can change Noise Seed. Enter an integer between 0 and 231 (about 2E9). If the seed is negative, the legacy LCG random number generator will be used; see NOISE RNG. If the seed is 0, the random number stream will be nonreproducibly randomized. Note that this is not the same as the NOISE SEED special variable.
Method |
Sampling |
VECTOR treatment |
Univariate |
Each parameter in the list is changed independently, while others are held constant at their original model values. |
The number of simulations for a VECTOR parameter is determined from the min/max/interval, overriding the global setting. |
Multivariate |
All parameters are changed together. |
If the number of simulations is greater than the number of VECTOR instances, values are repeated as needed, in shuffled order. |
Latin Hypercube |
Like multivariate, but parameter values are stratified along each dimension. For the uniform distribution, a random value is drawn in each of the N intervals in the min-max range. For other distributions, selections are made from a sorted, oversampled list of draws. |
If the number of simulations is greater than the number of VECTOR instances, values are repeated as needed, in shuffled order. |
Latin Grid |
The size of the VECTOR dimension is determined from the min/max/interval, overriding the global setting. |
|
File |
Use a file to specify the sample to be tested. This file must be a tab delimited text file (UTF8 for international characters). The first row should contain a list of model constant names (tab delimited), with the corresponding values on each successive row. If a value is missing from this file the previously used value is repeated. See Control File Format. |
NA |
NOTE If you enter only 1 parameter in the sensitivity parameter list, then Univariate and Multivariate searches are the same, and Grid and Hypercube searches are the same.
See Legacy Methods for sampling prior to version 6.3.
Parameters
Currently active parameters is a list of model Constants and the way you want to control them. Each line contains a constant and the controlling information in the form:
model const=RANDOM UNIFORM(.4,.8)
and so on. To remove an item, click on it then click on Delete Selected. To modify an item, click on it then click on Modify Selected, or double click on it. To add an item, enter the information about the item in the editing box and click on Add Editing.
Delete Selected deletes the currently selected item in the list.
Modify Selected removes the currently selected item from the list and puts it in the fields below for modification. If you are currently modifying something you will be asked if you want to abandon what you are modifying. Answer yes if you want to discard it. Answer no if you want to keep it, then click on Add Editing, then click on Modify Selected.
Add Editing adds the information you are working on into the list. If you have not finished the specification you will receive a message telling you what is missing.
Parameter lets you specify the model Constant that you want to change. Note that you can only change model Constants. Click on the Sel button to open the variable selection dialog to select a Constant.
NOTE If you are using a model with subscripts the full set of subscripts (with Subscript Constants not Ranges) must be specified here.
Distribution lets you pick the distribution you want to use for the sensitivity on the model Constant. See "Distributions" below for a discussion of the different choices. The box to the right contains a drop-down list of the available choices.
Model Value:Will display the base model value for the parameter currently in the editing box. This can be helpful for determining the appropriate range to vary a parameter.
Minimum Value lets you set the minimum value that the model Constant can take on. This can be a number, or the name of a model Constant. (The reason to use a model constant here is largely for conducting sensitivity testing from within a Vensim Application. In this way you can allow the application user to modify the sensitivity ranges through the use of model constants.)
Maximum Value lets you set the maximum value that the model Constant can take on. This can be a number, or the name of a model constant.
The four remaining boxes are, potentially, used to let you specify additional information about the distribution of a model Constant. They can be numbers or model Constants. Each will be grayed if it is not used with your current selection of distribution.
Examples
See the examples in OptSensi .