Vensim also supports the entry of data from Tab delimited files, Lotus 123 format worksheets, and Microsoft Excel format worksheets. These formats can readily be created by spreadsheet programs. The general format for a Tab delimited file is just a series of numbers separated by Tabs (ASCII 08). Lotus 123 format worksheets (.wks, .wk1, .wk2 and .wk3) are created automatically by Lotus 123 and can normally be created from other spreadsheet programs using the Save As command. Excel format worksheets (.xls) are automatically created by Excel. Note that Vensim's importation mechanisms support only the simple two dimensional table format for spreadsheet data.
In working with these different sources of data, all data is treated in the same way and we will refer to data from any of these sources as being in a table or tabular format. In working with tables, Time can either run across the rows or down the columns. Because spreadsheets often have commentary that will not be used, and may contain data in non-numeric format there are a number of options that can be used when importing files.
A tab delimited file (upset.tab) might look like this (the first character after a Tab is shown bold):
Upset electronics production notes:
| ----------------------------------- |
| 1984 1985 1986 |
| Starts | 23300 12235 19943 |
Note that there was a strike in 1985
| Workforce | 130 143 129 |
| Turnover | High Low Normal |
This file contains numbers representing time, starts and workforce, some commentary and spacing and some qualitative measurements of turnover. In order to convert this to .vdf format you will need to:
| 1. | Use rows 3-7 (row 1 is a title and row 2 contains only dashes) and columns 1-4 . |
| 2. | Look for time going across. |
| 3. | Get time from row 3. |
| 4. | Skip row 5. |
| 5. | Get the variable names from column 1. |
| 6. | Convert Low, Normal, and High, (in row 7) to numbers (0,1 and 2). |
The Model>Import Dataset command allows you to do this. But before you invoke that command, it is necessary to set up a translation file that can be used on row 7 to convert the qualitative entries into numbers. Call this file upset.trn and use the Text editor to enter the following
Low=0
Normal=1
High=2
The left hand side is the name as it appears in the original file. The right hand side is the name as it should be translated — this will normally be a number.
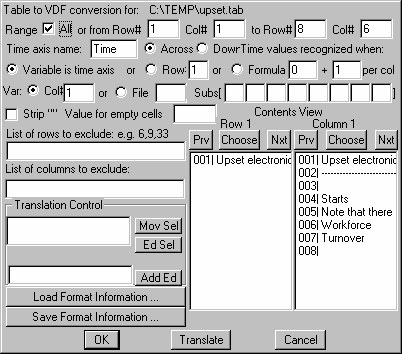
Assuming that the original tab delimited file is called upset.tab when you invoke the Import Dataset function and select the file upset.tab you will see:

In order to properly translate the file we need to make the changes listed above. To do this:
Change the from Row# from 1 to 3 to reduce the range used.
Time Across is the default and does not need to be changes.
Fill in the Row: field for Time with 3. The radio button should automatically highlight.
Enter 5 in List of rows to exclude.
Var: the location of variable names has column 1 as the default just leave this.
Type "ROW#7=upset.trn" in the box to the left of the "Add Ed" button and click on that button. You should see:
Click on the OK button.
You should get the message translated without error, and 3 values should be written for each of starts, workforce and turnover.
Table2vdf Options
Working through the Table to VDF dialog box the options are:
Range displays that portion of the table you want to use. You can click on the All checkbox or type in the values you want. Anything outside this range will simply be ignored. Regardless of the range you choose, the row and column numbers used elsewhere always refer to those of the original table.
Time Axis Name lets you specify the name to be used for the time axis. This is normally Time, but could be an alternative time axis name such as Decimal Year.
| • | Across - specifies that time runs across the table. |
| • | Specifies that time runs down the table. If you click this all of the Col# labels below will become Row# labels and vice versa. |
Time Axis Recognized When:
| • | Variable is time axis: looks for the name entered in the Time Axis Name: box and then considers that row or column as time. Note that with this option enabled, multiple time axes may be entered, and variables below the entered time axis will be assigned that time axis. In addition, any variable names enclosed in angle brackets < > will be treated as alternative time axes even if the name is different from that of the main time axis. |
| • | Row# - lets you specify the row (or column) in which to find the time values. This was necessary in our example because the time axis was not named. |
| • | Formula - lets you specify time as a formula. The formula is applied only to the columns/rows that are actually used. In our example the formula 1984 + 1*col would have given the same results (note that col in this formula is relative to the first column with numbers and is not increased on excluded columns or columns with name information). |
Var:
| • | Col# Specifies the Column/Row in which to find the variable names. |
| • | File - specifies the file in which names are assigned to each row or column. This file must have the format |
4=Starts
5=Workforce
6=Turnover
and must include names for all the rows or columns of interest. The default extension on files for naming variables in .var, but you may choose another.
Subs: If the Subscripts for a variable are in a place different from the variable name, you can tell Vensim where to look for subscripts. Enter the column or row number for each subscript. This works just like finding the variable name except that the subscript names are appended to the variable name with the appropriate punctuation.
Strip "", if checked, will look for quotation marks surrounding names and automatically strip them off. This is useful for spreadsheet programs that dump out names with quotation marks around them. All types of quotes, including single quotes, double quotes and balanced quotes will be stripped.
Value for Empty Cells: Sets a value for any cells that are empty (contain only spaces). Normally empty cells are just ignored but sometimes it is useful to assign them a value (often 0.0).
List of Rows to Exclude: Allows you to create a list of rows that are not to be processed. Rows outside of the specified range are automatically excluded. This list should be number separated by commas as in: 1,3,7,9. If you want to exclude many contiguous rows you can use a minus sign - between the numbers as in 1,3,4-8,12 which is the same as 1,3,4,5,6,7,8,12.
List of Columns to Exclude: This is the same as the list of rows to exclude except that it applies to columns. Again note that the column numbers are those of the original table.
Translation Control: Allows you to specify the translation of strings to numbers (or other strings). To use this enter ROW#n=filename or COL#n=filename in the box the left of Add Ed, then click on Add Ed.
| • | Mov Sel — is a simple mechanism for reordering the list. Click on the line you want to move, then click on the Move Sel button then click on the line you want to place the line you are moving above. The line will be moved. Because the translation process always works from the original table, the order of translation is not important. This is simply a mechanism for improving readability on the translation list. |
| • | Ed Sel — allows you to modify an existing entry. Click on the line you want to edit, then click on Ed Sel and the line will be moved to the editing box. When you are done editor click on the Add Ed button. |
| • | Add Ed — moves the contents of the editing box into the list. Before the contents are moved they are checked to make sure they have the right syntax. The filename is not checked for existence or format until you click on the Translate Button or the OK button. |
Load Format Information: is a shortcut for typing in all the formatting entries you can make. This allows you to open a previously-created format file and use this file, instead of typing in all the format information every time you process a particular data file.
Save Format Information: allows you to save to a format file the information that you have entered into the Table to Vdf conversion dialog. If you are only making a couple of changes, this is not so important. But if you have entered a large amount of formatting information, a format file can be very helpful. If you click OK and you have not saved a format file, you will be prompted to do so.
Contents View: The information under contents view is designed to allow you to review the table with which you are working. You can see a particular row using Choose, and scroll through the rows using Nxt and Prv. Similarly for columns. When you press the Translate button, the content of the rows and columns after they have been translated is displayed.
OK Attempts to convert the data to .vdf format. If you have entered a bad number you will be given the message "Cannot read screen" and positioned in the offending box, otherwise an error window showing the results of the conversion will appear.
Translate: Uses the translation control entries to convert any rows or columns and displays the results for the translated rows and column under Contents View.
Cancel lets you leave the dialog without performing any data conversion.